Telegram bots have become one of the easiest ways to automate messaging, build chat-based services, manage online communities, and integrate applications with one of the world’s most popular messaging platforms.
Whether you’re building a customer support assistant, sending automated notifications, managing a Telegram community, or experimenting with the Telegram Bot API, every project begins with creating a Telegram Bot.
Fortunately, Telegram makes the process straightforward. You don’t need programming experience or special software—just a Telegram account and a few minutes.
In this guide, you’ll learn how to:
- Create a new Telegram Bot using BotFather
- Choose a bot name and username
- Generate and securely store your API Token
- Configure your bot’s profile
- Enable group and channel permissions
- Test your bot before using it
Let’s get started.
What Is BotFather?
Every Telegram Bot is created and managed through BotFather, the official bot management account provided by Telegram.
Think of BotFather as the control center for all your bots.
Using BotFather, you can:
- Create new bots
- Change a bot’s display name
- Update its username
- Upload a profile picture
- Generate or reset API Tokens
- Configure privacy settings
- Manage group and channel permissions
If you own multiple bots, BotFather also provides a convenient dashboard to manage them all from a single conversation.
Open BotFather
Open Telegram on your mobile device, desktop application, or web browser.
Search for BotFather and select the verified account with the blue checkmark.
Alternatively, visit:
https://t.me/BotFather
Press Start to begin the conversation.
Tip
If BotFather doesn’t appear in search results, verify that your internet connection can access Telegram and make sure you’ve selected the official verified account.
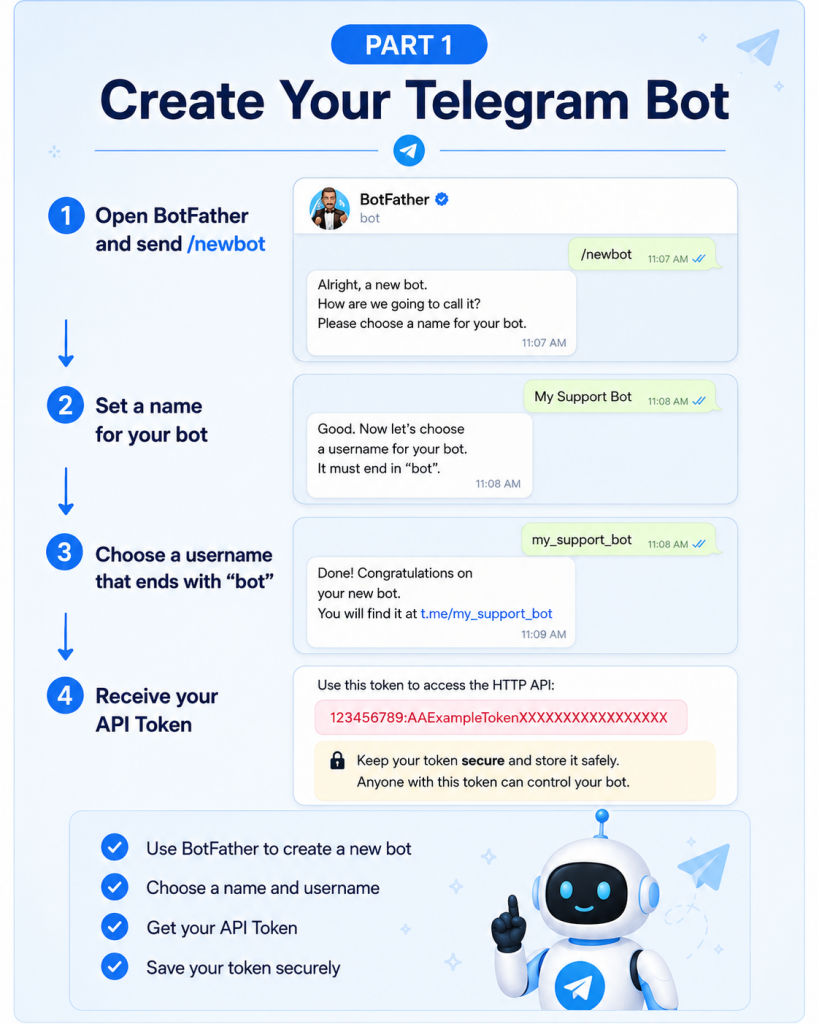
Step 1: Create a New Telegram Bot
Creating a bot only requires one command.
Send the following message to BotFather:
/newbot
BotFather will immediately start a guided setup process.
You’ll be asked to provide:
- A display name
- A unique username
After both are accepted, your new bot will be created automatically.
Step 2: Choose a Bot Name
The first prompt asks for your bot’s display name.
This is the name users will see when they open your bot’s profile or receive messages from it.
Unlike usernames, display names don’t have strict formatting rules.
Examples include:
- Customer Support
- Order Assistant
- Weather Updates
- Travel Guide
- My Store Helper
You can use spaces, capital letters, and even non-English characters if appropriate for your audience.
Don’t worry about making it perfect—you can always change the display name later.
Step 3: Create a Username
Next, BotFather asks for a username.
Unlike the display name, usernames must follow Telegram’s naming rules.
A valid username must:
- Contain only letters, numbers, and underscores
- End with bot
- Be globally unique
Here are some valid examples:
myhellokpibot

customer_helper_bot

newsupdatesbot

support_2026_bot
Examples that won’t work include:
| Username | Why It’s Invalid |
|---|---|
| my-hellokpi | Doesn’t end with “bot” |
| customer | Missing “bot” suffix |
| 我的机器人 | Contains unsupported characters |
| bot | Too short and already reserved |
If your preferred username is already taken, simply add numbers or underscores until BotFather accepts it.
For example:
myshop_01_bot

customer_service_bot

weather_helper_bot
Once your username is accepted, Telegram immediately registers it and creates your bot.
Step 4: Get Your Telegram Bot API Token
After the bot has been created successfully, BotFather sends a message containing an API Token.
It looks similar to this:
123456789:AAExampleTokenXXXXXXXXXXXXXXXXXXXX
This API Token is extremely important.
It acts as the authentication key whenever your application communicates with Telegram’s Bot API.
Almost every Telegram integration requires this token, including:
- Custom applications
- Websites
- Automation platforms
- Notification systems
- AI assistants
- Chatbots
Without the token, your software cannot send or receive messages on behalf of the bot.
Store It Somewhere Safe
Treat the API Token like a password.
Anyone who possesses the token can control your bot.
For security reasons, you should never:
- Share it in public chat groups
- Upload it to GitHub repositories
- Include it in screenshots
- Store it inside public documentation
Instead, consider storing it in:
- Password managers
- Environment variables
- Secret management services
- Secure configuration files
Important
If you believe your API Token has been exposed, open BotFather immediately and generate a new token. The previous token will become invalid.
Information Worth Recording
After creating your bot, it’s helpful to keep a small record of its essential information.
| Item | Example |
|---|---|
| Bot Name | Customer Support Bot |
| Username | customer_support_bot |
| API Token | 123456789:AAxxxxxxxxxxxxxxxx |
| Creation Date | July 2026 |
Keeping these details documented can save time later when deploying applications or troubleshooting integrations.
What’s Next?
At this point, you’ve successfully completed the most important part of the setup:
- ✅ Created a Telegram Bot
- ✅ Registered a unique username
- ✅ Received your API Token
- ✅ Stored your credentials securely
However, before using your bot in groups, channels, or automation projects, you’ll still need to configure its profile and permissions.
In the next section, we’ll cover:
- Customizing your bot’s profile
- Enabling group access
- Disabling Privacy Mode
- Configuring administrator permissions for groups and channels
- Best practices for permission management